Tuesday, September 28, 2010

Review: Waring Pro Waffle Maker

Many years ago my parents bought us our first waffle maker, an Oster. We used it relentlessly and it finally expired last year shortly after this post about the waffle recipe we use.

We finally got around to buying its replacement last month, a Waring Pro Double Waffle Maker (Model WMK600). We bought it at Sam's Club for $64.88. That seems to be a pretty good price to what I've seen online so I thought I'd let you know in case you were in the market for one. [Standard Disclaimer]


I have used it twice and I'm pleased with it's performance.

Some of the things I like about it are:
  • Can do twice as many waffles in the same amount of time. That's my favorite part because no one wants to be sitting around waiting for waffles on a Saturday morning.
  • It has audible and visual signals to let you know when it is preheated and when a waffle is finished cooking.
  • It has a variable control for how crispy you want them.
  • It is entertaining to flip the rotating part. Yes, I still play with my food.
  • The non-stick cooking surfaces area seasoned well.
  • The exterior surface is easy to clean.
The few downsides are
  • It is a bit bulky and takes up storage space, but most waffle makers do.
  • The first time I used it, the top part popped open during cooking but I might have slightly over filled it.
When I do waffles on the weekend, I usually make a few extra that are a touch underdone and keep them in a zip top bag in the fridge. Then on Mon/Tues, Trevor can have a quick waffle breakfast by just popping them in the toaster. Much better than Eggos!

Update 12/26/10: I have now been using this waffle maker for three months at least every other weekend. It has worked like a champ and turns out some great waffles.

I have one of those, "Is it just me?" type of questions.

For pancakes, I prefer real maple syrup, Grade B if I have a choice. But for waffles , I have the hots for Ms. Butterworth or other "regular" syrup as Trevor calls it.

Maple syrup just doesn't taste right on waffles to me. Is it just me?

Monday, September 27, 2010

September Cooking Challenge

Remember Professer TBD in college?

I'm part of a yet to be named group of live fire food bloggers that does a monthly challenge. A meat, vegetable, starch, and fruit are selected randomly and then you have a month to come up with a meal using all 4. This months ingredients were easy!

Pork chop
Zucchini
Rice
Raspberries

I knew right away that I would make a raspberry bbq sauce for the pork chops. I adapted a blackberry bbq sauce that I've made before. I was going to use raspberries and raspberry preserves, but the raspberries broke down so well I skipped the preserves.

Raspberry BBQ Sauce for Pork Chops
Adapted from John Besh

2 Tbsp olive oil
1 Tbsp ginger, peeled and minced
1 clove garlic, peeled and minced
1/2 cup raspberries
1 ea green onion, chopped
2 dried red chilies
1/4 cup fig infused vinegar
1/4 cup broth
1/4 cup bbq sauce
salt and pepper

Heat the oil over medium heat and saute ginger and garlic for 1 minute. Add the raspberries and onion, stirring often and breaking down the berries into a paste. This took about 2 minutes. Add the remaining ingredients, mix well and simmer until thickened, about 5 minutes. Remove and allow to cool. You can use as is for a rustic sauce with texture but I used an immersion blender to smooth it out.

For the pork chops, I had 4 nice thick bone in pork chops. To me, bone in pork chops are the "porterhouse steak of pork". I brined them for 2 hours in:

Pork Chop Brine
Just something I have come up with but I'm sure I borrowed from several people.

2 cups apple juice
2 cups water
3/4 cup turbinado sugar
1/4 cup kosher salt
12 whole peppercorns
2 bay leaf

I seasoned them with Billy Bones Competition rub and then gave them a quick sear over a 500f fire.

I brought the Big Green Egg down to 300f and set it up for indirect heat. I glazed both sides with the sauce and cooked until they finished to 145f.

Alexis saved the day with zucchini. She made these zucchini rolls [Click for recipe link] on her Big Green Egg.

These things were huge, more like loaves than rolls! But they were very good.

These took forever to bake, perhaps because of going in with a cold stoneware? It took 45 minutes instead of 20-25.

The rice was our basic rice pilaf.

2 tbsp butter
1 cup rice
1/4 cup carrot, peeled and diced
1/4 cup celery, diced
1 green onion, chopped and divided into white and green parts
1 cup stock
3/4 cup water
1/4 cup white wine

Saute carrot, celery, and white part of onions in oil for about 5-8 minutes until softened. Stir in and rice and continue sauteing until the rice turns golden and emits a nutty aroma. Add the liquids, cover and simmer for 18 minutes. Add the green onion, toss and cook covered another 2-5 minutes until all liquid is absorbed.

All in all it was a very good meal, despite having to put up with the rain. The BBQ sauce worked exceptionally well with the chops and I loved the zucchini rolls.

Here are the other participants. Click on their blog title to see their creative challenge entries.

Robyn of Grill Grrrl

Robyn Medlin is the "grill girl" behind grillgrrrl.com. Her focus is on healthy, simple and creative recipes on the grill. She encourages women to learn to grill as it a great way to create healthy, flavorful dishes without all the fuss and clean up in the kitchen. This "grill girl" holds quarterly "Women's Grilling Clinics" as a way to encourage women to not be intimated by the grill. As a McCormick's flavor correspondent for their "This Week in Grilling Campaign", Robyn shares fun, tropical video recipes documenting her grilling adventures from her backyard in Sunny, Hollywood, Florida.

Larry of The BBQ Grail
The BBQ Grail website was created in 2007, initially to document the author’s quest to find the perfect backyard BBQ experience. Since that time The BBQ Grail has become one of the more popular BBQ blogs on the internet, including a listing on Alltop.com as one of the top BBQ blogs.

Paul of No Excuses BBQ

The No Excuses BBQ website was started in January of 2009 as a way to record the author's goal of barbecuing at least once a week throughout the year and showing the results to the world. Somewhere along the way things got out of control; two years later the streak is intact and shows no sign of stopping anytime soon. In the process, No Excuses BBQ has become a fairly popular BBQ location on the web and is listed as one of the top BBQ blogs on Alltop.com.

Robert of
Into The Flames
Rob launched Into the Flames in the summer of 2010 as a way to share his passion for cooking, eating, and exploring food.

This was fun and I look forward to the challenge October brings!

Saturday, September 25, 2010

Beef Back Ribs (aka dino bones)

I've done beef back ribs several times now and I've learned something the past two times.

Consider this a partial retraction. There is a difference between "done" and "ready".

The first two times I smoked them and at two hours the were "done". "Done" as in safe to eat. They tasted good and we enjoyed them.

But recently I decided to smoke them for the 4+ hours that others did. I committed to cooking them that long and if they sucked, then oh well. (pic of my 11 y/o basting the ribs)


To my surprise, they didn't dry out, they kept their taste and damn, they were tender as could be. So while our beef ribs before had been "done" they weren't "ready".

Today I tried making them using Adam Perry Lang's higher temp method in his recent book, BBQ 25. Tons of thanks to WhiteTrashBBQ for hosting the giveaway that put this book in my paws.

Even though it was a higher temp cook than traditional low and slow, I still sported wood. I buried a nice chunk of cherry wood at the bottom of the coals and set one on top. Fruit woods like cherry and apple give more color to your meat.

Of course, I made my alterations to the rubs and seasonings but his process produced the best beef ribs we have had so far.

Here's how they turned out.


We served them with garlic mashed potatoes and yeast rolls that Alexis made on her Egg.

What do you mean "No vegetables?"......don't you see the chives sprinkled on the mashed potatoes?

Alexis and I both agreed that this is THE technique we will use for beef back ribs from now on.

This is my submission to Tailgating Time over at Martha's Seaside Simplicity. If you have a tailgate type food posted, get over there and link up.

Friday, September 24, 2010

Any Rub Glaze

Fall arrived this week.

That changes the types of things I cook, how about you? For me it means more soups and roasts. And on the first evening of Fall, that is what I made, a pork loin roast.

One of the rubs I received in the free sampler pack from McCormicks at the beginning of the summer was their new Grill Mates Applewood Rub.

It was good back then when I made pork chops....

But the "appleness" of it really made me hold onto this one until after summer. I guess that is because I use apple wood for smoke more in the Fall. Not sure why I do that, apples are seasonal but apple wood is available all year.

I rubbed a pork loin roast with the Applewood Rub. After a quick sear of the roast, I set up my grill for an indirect cook. In a half steam pan under the roast rack, I added some sliced carrots, quartered onions and half a head of garlic. I poured about a 1/2 cup of white wine and 1/2 cup of chicken stock over that and sprinkled tarragon over the carrots. I added 4 potatoes wrapped in foil over the hottest spots.

I roasted all of that for about an hour at 350f. The temps rose up a bit on me but I think that was from all the food coming up in temp and the opening of the Egg to glaze the meat let in more air.

While that was going, I made my "any rub glaze". This is the simple "go to" glaze that I use for poultry and pork roasts. I like it because the honey, wine, butter mixture works with just about any rub. This is an easy way to add another complementary layer of flavor.

Any Rub Glaze

1/4 cup butter
1/4 cup white wine
1/4 cup honey
1-2 tsp of whatever dry rub you are using

Melt the butter in a small sauce pan and blend in the other ingredients.

See? Easy. Then just apply the glaze 2-3 times in the last 30 minutes of cooking.

This was a great dinner, it disappeared quickly. The thin sliced pork was moist and flavorful and the potatoes were perfectly baked. The tarragon carrots tasted wonderful and were good enough for seconds, but I like mine more tender. Honestly, I like my carrots overcooked to where they give a fork no resistance. So for me, next time I'd parboil them for a few minutes before throwing them in the roast pan.

The McCormick's rub is perfect for a pork loin roast. I am wary about any "wood" flavoring from anything other than real smoke, but this rub works. [Standard Disclaimer] You could even do this easy roast in your oven.

I didn't intend for this to be a McCormick's post but that reminds me, they have two new products that I am having a love affair with right now. While shopping two weeks ago, Alexis picked up a bottle each of their Roasted Cumin and Roasted Saigon Cinnamon. Talk about upgrade! Cumin and cinnamon are flavor powerhouses already but these two take it further. I used the cumin in fajitas a few weeks ago and the cinnamon in a rub from Smoke and Spice. Wow, they both sing.

Fire Day Friday
Not that I didn't already take up enough of your time, but my Fire Day Friday post over at Our Krazy Kitchen was Grilled Garlic Chicken with Sherry Butter Sauce.

So how does Fall alter your cooking?
What Fall dishes are you really looking forward to?
What Summer recipes are you sad to see go for the year?

Tuesday, September 21, 2010

Smoked Turkey Breast Roast with Honey Maple Glaze

Smoked turkey is excellent but you don't always have time to thaw, brine and go through all of the preparations for smoking a whole turkey. At those times, this recipe from Chris Lilly's Big Bob Gibson's BBQ Book is ideal!

It doesn't take as long as a turkey but still gets the smoke flavor in there. It may seem a bit over spiced when you see how much rub I put on, but the sweet & sticky glaze counters that. Slicing it thin for sandwiches on home made bread makes it out of this world!

The book calls for a whole turkey breast but I am using a Honeysuckle White Turkey Breast Roast, which is about 1/2 of a turkey breast. Perfect for serving 4 people. Since I am using a smaller cut, I reduced the rubs and glazes proportionately.

Smoked Turkey Breast Roast with Honey Maple Glaze
reprinted with permission from Big Bob Gibson's BBQ Book

1 Boneless skinless turkey breast, about 4 lbs

Wet Rub
2 teaspoons brown mustard
2 teaspoons extra-virgin olive oil
Dry Rub
1 Tbsp dark brown sugar
1 tsp garlic salt
1 tsp celery salt
1 tsp paprika (used my home made stuff)
1/2 tsp black pepper
1/4 tsp cayenne pepper (used my home made stuff)

Glaze
4 Tbsp butter (1/2 stick)
3 Tbsp Maple syrup
1 Tbsp Honey (I used creamed honey)

Get your fire going and set up your grill/cooker for indirect heat. Today I was using Wicked Good Weekend Warrior lump coal and a mix of hickory and cherry chunks. In the book, Chris recommends hickory, oak, or maple. Apple would also work.

While that is coming to temp, mix your dry rub ingredients together. In another bowl, mix your wet rub ingredients together. I like using a coarse ground mustard for this, it just adds to the texture.

Rub your wet rub all over your meat. Now sprinkle liberally with your dry rub mix, making sure to get all sides and edges.

If you are using a breast like Chris did in the book, smoke for 2 1/2 hours at 250f. During that time, combine the glaze ingredients over low heat until combined. Glaze the smoked turkey at the 2 1/2 hour mark and then cook another 15 minutes. Glaze again and then cook for another 15 minutes. That should put you at 3 hours and an internal temp of 165f.

Using the smaller breast roast, I had to adjust my times. Here's my log.

As you can see, I really had to cut back on my cooking times using the smaller cut of turkey. I glazed at 45 minutes and 1 hour.

When the internal temp hit 160f I pulled the turkey and let it rest on a cooling rack for about 15 minutes.

If I were a more patient and less hungry man, you'd have pictures of the sandwich too. But I just couldn't wait any longer! But the spiciness of the rub and the sweetness of the glaze were a bbq yin and yang. This is a definite repeat.

Once again, Chris Lilly and Big Bob Gibson's BBQ Book delivered. I have several BBQ cookbooks that I really like (see my Library tab) but this is the only one that has delivered on every single recipe I have tried from it. It gets my top recommendation.

[Standard Review Disclaimer] applies as always but other than meeting Chris a few times, I have no affiliation with him or Big Bob Gibsons and I didn't get compensated for this post. I am just a big fan of this book.

Monday, September 20, 2010

Coal Fired Sweet Potatoes

Most of the recipes I post on Nibble Me This can be made on a gas grill or converted to an oven. But not this one. This only works with a bed of real coals.

This little trick comes from Big Bob Gibson's BBQ Book by Chris Lilly. It is so easy and effective that it is ridiculous. You simply roast sweet potatoes on a bed of coals. No oil. No rub. No foil.

I had just finished smoking a turkey breast and put 4 sweet potatoes in the coals.

20 minutes on one side.

Flip and 20 minutes on the other side.

Don't worry if they look, smell, or otherwise seem that they are burning. The sweet potato shells may even be fragile and break when you remove them. It's okay.
As they are cooling melt 1/4 cup butter and mix in 1/4 cup maple syrup, 1/8th teaspoon each of cayenne pepper, cinnamon, and salt. Chris Lilly also adds pecans to his mix but pecans represent all that is evil in the world so I skipped them. Split the sweet potatoes and drizzle the butter mixture over them.

These were so tender that they just melted under the fork as it drove down into them. The sauce poured buttery-sweet-spicy flavor all over the potatoes.

This is a great technique for cooking sweet potatoes if you ever need cooked sweet potatoes in a dish. But adding the sauce topping makes them shine as a side dish.

It's dishes like these that make Chris' book one of my favorite live fire cook books.

Sunday, September 19, 2010

Country White Bread

The smell of fresh baked bread is a powerful thing. It can evoke memories, set moods, and certainly will fire up an appetite. Stores even use that smell to stimulate purchases (read this).

For me, I can remember smelling my mother's home made bread baking while I played in the front yard. Her bread was one of my favorite foods. She didn't make it all the time but when she did, it was a treat for me. I'd rather have fresh home made bread than cake.

I have enjoyed watching Alexis learning to use her Big Green Egg these past few weeks but I am going to have to up my work outs! She has been baking up a storm of rolls, loaves, and other treats, all by using the power of fire.

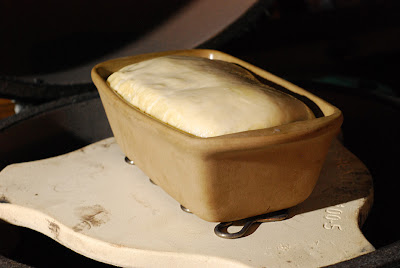
She did this one by following this recipe for Country White Bread and then baking it on her Egg at the prescribed cook times.

Country white bread on the kamado grill, big green egg bread, grill dome bread
The stoneware style loaf pans work exceptionally well in live fire baking.

Country white bread on the kamado grill, big green egg bread, grill dome bread
It smelled so good it was hard to let it rest for a few minutes.

Country white bread on the kamado grill, big green egg bread, grill dome bread
The greatest thing since...... um sliced bread.

Saturday, September 18, 2010

Corn Dogs - It's Fair Food Time

The Tennessee Valley Fair winds down tomorrow but there is one last night of lights on the midway, screams rushing by on rides, and the smell of fair foods.

In her article about fair foods last week, KnoxNews Food Writer, Mary Constantine said, "A dip dog was high on my list. After all, what's the sense in visiting the fair if you aren't going to sample the ultimate carnival food?"

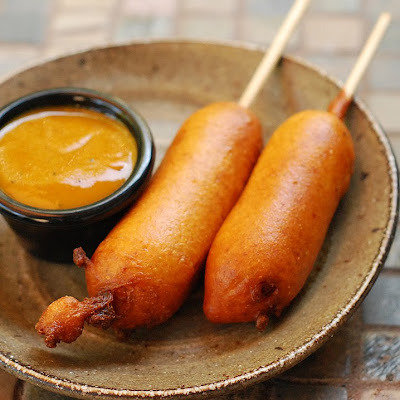
I couldn't agree more with Mary. The corn dog (called dip dogs in East TN) is the king of fair foods. So after Trevor's 2 1/2 hour football practice this morning, I whipped up our favorite corn dogs for lunch. That was one hungry and happy boy.

There are a million and one corn dog recipes out there. The thing that seems to separate this from most is the use of yellow mustard (instead of dry mustard) in the batter. Don't worry if the batter looks a little too yellow, it will cook out fine.

Mini corn dogs
Mini Corn Dogs
Source: batter based on a recipe in my Try Soon queue that had no source info :(
Makes 16 mini corn dogs

Batter Ingredients
1 cup all purpose flour
1/2 cup yellow corn meal
1/3 cup white sugar
1 1/2 teaspoons baking powder
1 teaspoon Kosher salt
1 teaspoon paprika (I used my homemade paprika)
3/4 cup milk
1/4 cup yellow mustard
1 egg
2 tsp vegetable oil

8 beef hot dogs, cut in half
16 bamboo skewers

Instructions
Mix the dry batter ingredients in a mixing bowl. Add in the liquid ingredients and mix thoroughly, then allow to sit for a few minutes.

TIP: The reason for cutting the hot dogs in half is so they will fit better in most home deep fryers or a pot. It just makes them more manageable.

TIP: If you only have 10 or 12" bamboo skewers, don't hurt your kitchen shears trying to cut them to size. Pruning shears work like magic.

Preheat a deep fryer or dutch oven with 2" deep of oil to 375f.

TIP: Make sure you wipe the dogs dry before dipping them. This will minimize those eruptions in the crust where it breaks open during frying.

TIP: It's easiest to dip the dogs in something tall and narrow. A pilsner glass is perfect for this.

Dip the dogs and twirl for a few seconds to let the excess batter slide off.Place gently into the hot oil and allow to fry for 2 minutes for a texture that is golden brown and a little soft or 3 minutes for a darker and crispier crust. It's a preference thing.

mini corn dogs
While yellow mustard is traditional for corn dogs, I had mine with Blues Hog Honey Mustard BBQ sauce which was excellent. I want to try the batter using the Blues Hog the next time just to see how it does.

So what is your favorite carnival, festival or fair food?

Wednesday, September 15, 2010

Adobo Mexican Rice

Or should I say Adobo mEGGxican Rice?

One of the dorkiest (dorkiest used in the best possible way) things some Big Green Egg owners do is to incorporate the word Egg into any word, such as EGGceptional, EGGciting or EGGcelent. It gets a bit old after a while but you can't blame their enthusiasm.

Where was I? Oh yeah, Adobo Mexican Rice. I had a flat iron steak and decided to make our usual fajitas.

I needed a good side dish and Crepes of Wrath's Adobo Mexican Rice seemed to fit the bill so I converted it for live fire cooking.

Adobo Mexican Rice
adapted from Crepes of Wrath

1/3 cup + 2 tablespoons olive oil (or vegetable/canola oil)
2 cups long grain white rice, uncooked
5 cloves garlic, minced
14.5 ounce can diced tomatoes
1/2 red bell pepper, roughly chopped & seeded
1/2 anaheim pepper, roughly chopped & seeded
1 onion, roughly chopped
1 tablespoon chili powder
3 chipotle chilies in adobo sauce
2 cups chicken stock
1 cup beer or water
salt, to taste

In a food processor or blender, process the can of tomatoes with juices, chopped bell pepper, chopped onion, chili powder, and chipotle chilies in adobo sauce.

Preheat a cast iron dutch oven over direct heat on a 350f grill. Add oil and allow to come until it just starts to smoke.

TIP: mise en place is not just for fancy kitchens, it's crucial for working on the grills.

Add the rice and saute about 8 minutes, stirring occasionally.


You know it's ready when it has a nutty aroma and turns translucent. Add in the garlic and cook for another 2 minutes.

Next add the tomato mixture, stock, and beer and bring to a simmer.

Once it begins simmering, switch to indirect heat.

Cover and simmer for 30 minutes. Give it a stir about every 10 minutes.

While that is going on, now is a good time to grill your protein. I put the marinated flat iron steak on the other Egg at 450f and grilled at 450f for about 10 minutes.

Serve with wedges of lime and cilantro.

The adobo rice had a lot more kick than I expected since I really didn't think that 3 chipolte and 1/2 anaheim pepper are what I'd consider "hot". It was very flavorful and was excellent served in the fajita along with the steak and peppers. This makes a heck of a lot. The original recipe said 6 servings but it yielded more like 10-12 servings. That's okay, more for leftovers!

Saturday, September 11, 2010

Fatboyz Firepits Pit Grilled Ribeyes

Open pit grilling is possibly the most challenging yet fun test of a pitmaster's skills.

An open pit is basically your camp site fire ring, a truck tire rim with a fire in it. It doesn't have the fancy vent controls or protection from the elements that modern cookers have. In fact, the only difference between an open pit and what cavemen used is the truck tire rim.


We received the final addition to our deck renovation today, a custom fire pit from Fatboyz Firepits. Like most fire pits, ours will be used primarily for warmth and socialization on our deck, but you know I had to use it for open pit grilling too!


The first order of business was simulating a camp fire. To do that, I used a chimney full of hickory wood chunks. Let them burn until you have glowing hot embers. If you are camping and already have a fire, let it die down to embers. This is a good time to enjoy a beer or 3.


Dump the hot coals into the fire pit and let the grill grate heat up. Rub it with an oil soaked rag and toss on some ribeyes seasoned with salt and pepper.

As you can see, there is not a lot to protect your food from wind and ambient air temps. It's up to the caveman....errr....you to move them over the heat as needed to cook.


Here's a tip from Adam Perry Lang's BBQ25 [Review upcoming]. Make an "herb brush" by tying fresh herbs onto a wooden spoon.

Start basting your meat with a mixture of butter, oil, and garlic after the first flip.

Even though you are cooking over coals, the baste will cause some flare ups. It's okay in moderation. I love the shot of the flame teasing the steak.

Because these are exposed to the elements, they took much longer than the 8 minutes I do them on a 450f Big Green Egg. They took right at 24 minutes with 6 minute flips to hit an internal temp of 125f.

Results:
The steaks lacked the grill marks of my usual Egg seared steaks and I was worried they might be more done than I like. But I was wrong. After a 10 minute rest, they were perfectly medium-rare. They were tender and juicy. This was different than my usual steaks but every bit as good. Part of that was cooking over pure wood embers and the herb brush basting added a little something too.

Because I only did I small fire, I ended up placing a grate with 8" risers in the fire ring. This got the steaks closer to the coals and also protected them a bit from the wind that was picking up. If I had a full sized fire I would have used the original grate.

Review:
Fatboyz Fire Pits
We stumbled across Fatboyz this spring at Pork Knox, a KCBS sanctioned BBQ contest. Danny custom makes these pits by hand (not CNC machined) which blows my mind considering the detail he gets. [NOTE: Original artwork was created by the talented Russ of Inner and Outer Demons.]

Danny can custom make pretty much whatever artwork or text you want. He is a true craftsman that is proud of his work.

These units are great for a fire pit, open pit grilling, or as a stand for dutch oven cooking. The cool evening temps are just around the corner and I look forward to spending nights out on the deck listening to a cracking fire.

We had him make one for my parents' 50th anniversary and now this one for us. Both were well made and about $100 cheaper than the store bought (and non-custom) fire pits we had priced. If you have any interest in a fire pit, we highly recommend you get in touch with Danny through his website. Shipping might be a bit for these hefty dudes but it's worth it.

[Standard Review Disclaimer] applies but we paid full price for these pits and Danny doesn't even know I'm posting this.