I smoked two pork butts yesterday and
Matt asked via Twitter: "Do you have a link to your pork method on the Egg? "
I didn't. I have a few posts about pulled pork but I've never fully outlined the steps I go through for smoking pork butts on the Big Green Egg. Here is what I do from start to finish. It's not the only way or "right" way, it's just works for what we like to eat at home.
Preparing the Big Green Egg
- Remove all used coal from the Egg and reserve.. Thoroughly clean out the ashes. Make sure all fire grate and fire bowl air holes are free of ash and coal.
- Wood: I do NOT soak my wood chunks. I use 4" x 1.5" x 1.5" chunks of seasoned hickory and cherry.
- I place the largest chunk of wood in the middle and a layer of the larger pieces of lump coal on the fire grate. Place three chunks of wood on top of that layer near the edges in three different places. Pour another layer of coal to cover that wood. Repeat until my wood and coal top the fire ring. I use the reserved used lump coal for the final layer since it's easier to start and pops less. My goal it to have wood distributed evenly from top to bottom and side to side so I get smoke through the whole cook.
- Open bottom vent and DFMT vent all the way. I light the coal with a MAPpro torch in 3 places. When temp reaches 200f, I cut the bottom vent to about 1" open. When it hits 220f, I shut the bottom vent to about 1/4" and close the DFMT vent but open the daisy wheel so the 6 holes are open.
- When the Egg reaches 250f, I place the plate setter in "legs up" and place my drip pan onto of that. My drip pan is a large deep dish pie pan that I bought from a restaurant supply store. I cover it with foil for easy clean up.
- I let the Egg hold at 250f until the smoke turns from white to clear or "sweet blue". It takes 15 to 45 minutes for the heavy white smoke to change over.
 |
| Foil covered deep dish pizza pans make great drip pans. |
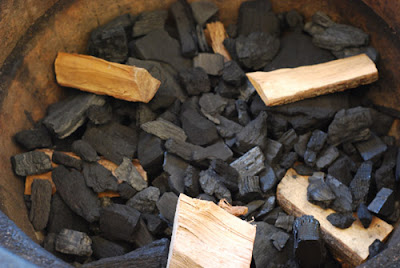 |
| Wood distributed up and down and all around. More coal will top this. |
Meat Prep
- I like to use 7-8lb pork butts (aka pork shoulder, Boston butts) that have a nice white fat cap and deep red meat. If I'm buying a twin pack, I try to make sure the two butts are close to the same size.
- Brine - I do not brine pork butts.
- Injection - I inject about half the time. I don't see a huge difference but I do think it helps me have more consistent results. I use Chris Lilly's world champion injection (recipe) and inject in 12-15 spots on the bottom and again on top.
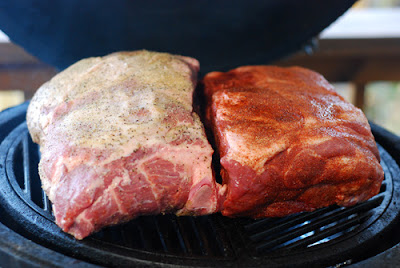
- Rub - I take my butts out of the refrigerator 1 hour before start time and apply the rub heavily on all sides. If making my own rub, I like to use a variation of Southern Succor Rub (recipe) but more and more I just use commercial rubs. Ones I like are Billy Bones Competition or Draper's AP rub.
 |
| Pork - seasoned with Drapers A.P. Rub and wood. |
 |
| Fat cap up or down? Neither, I trim it off for a better bark. |
Smoking
- Once the Egg is stabilized at 250f (dome temperature) and the smoke is either clear or thin blue, I put my pork butts on, fat cap facing up. There's two schools of thought on the fat cap and both have their "scientific arguments". I've tried it both ways and just prefer fat cap up. UPDATE: Now I just remove the fat cap altogether. There is enough intramuscular fat to keep things moist, getting rid of the fat cap just gives you a better bark.
- I check the Egg and meat internal temps every hour just to make sure the Egg temp is still stable at 250f and the butt temps are progressing as expected (see chart below for an example).
- Temp Adjustments - The Egg is pretty stable. I don't make any changes if it is within 10 degrees of my target temp. If it gets more than that, I adjust gradually. Guiding temps on an Egg is more like operating a boat instead of driving a car, you can't just start slamming on the brakes or stomping on the gas. If the temps start to drop about 8 hours in, I check for smaller pieces of coal blocking fire grate holes and use a wiggle rod (metal skewer with the tip bent 90 degrees) to clear them.
- Guru and other electronic controls - I don't use any electronic controls, blowers, etc. I don't have a problem with people that do. For me, it just seems like they just add more complications that can go wrong. I do pretty good just minding my two vents.
- I plan on 1.5 hours per pound but allow for as short as 1 hour/lb or up to 2 hours/lb. Mine are pretty consistent at 1.5 hours.
- If I'm cooking more than one butt, I like to rotate the cooking grate 1/2 turn when the butts hit 160f (about the halfway point usually) for more even cooking.
- I remove the butts from the Egg when their internal temp hits between 195f and 200f. I double wrap them in high density aluminum foil and place them in an empty cooler to rest for at least 1 hour but up to 4 hours.
 |
| 2-3 butts fit easily on a Large BGE. An adjustable rig can double that. |
Rotate your thermometer dial so that your target temp is at 12 o'clock. Then you can
see if you are on the right temp with a quick glance and from several feet away.
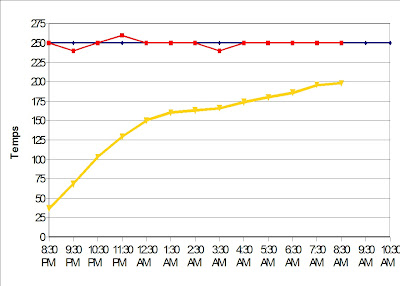 |
| Data from an actual cook. Yellow line is the meat temp. Notice the typical "stall" |
Finishing
- After the rest, I take the pork butt out of the foil, reserving any juices. I shred or "pull" the pork using two large forks. The bone and any remaining sections of fat are "discarded" (give to the dog).
- Seasoning - Once the pork is pulled, I drizzle the reserved juices over the pork. I sprinkle about 2 Tbsp over the meat. I also pour a little of "finishing sauce" over the pork, just enough to lightly mix in. An 8 lb butt will yield about 4lbs of meat and I only use about 1/2 cup of finishing sauce on it.
 |
| I get so full during the "pulling" part, I don't know why.... |
Storing and Reheating
- We vacuum seal pulled pork in 1 lb batches (4 servings) and freeze it for up to six months (date the bag).
- To reheat, put the sealed bag straight from the freezer into a simmering pot of water for 5 minutes. When it's warm it's ready to eat.
 |
| Pulled pork sandwich with Bush's Grillin' Beans - Smokehouse Tradition |