Showing posts with label tip. Show all posts

Monday, October 19, 2015

Troubleshooting Temperature Drops For Big Green Eggs and other Kamado Grills

I received the following e-mail from Eger, a new Big Green Egg owner, last week:


I'll address the second part of the question first:
I did encounter that problem when smoking my brisket, my temp dropped by 50 F by the morning and it took me over an hour to bring back up the temp by opening the vents all the way. I didn't know why?!

This has probably happened to any kamado griller who has done a few overnight cooks.  You get everything stable and going well, take a nap, and wake up to find your temperatures have plummeted.  There are a few things that can cause this.
  1. Ran out of fuel - highly unlikely.  Every kamado that I have used is capable of going at least 18 hours at low and slow temps on a full load of coal.
  2. Fire burned out in a pattern.  This doesn't happen often but I have seen it.  Sometimes the fire burns into a weird pattern where parts of it aren't making good contact so it doesn't pass the fire on to the neighboring coal. So you have fuel left but the fire just burns out.  Typically when I have seen this, the fire was started with a starter cube in the middle of the coal.  The fire burns straight down leaving unburned coal on the sides.  I light my fires in three spots around the edges so the fire will burn inwards and down.
  3. Holes in charcoal grate are clogged and blocking airflow.  Very common
  4.  and this is exactly what the wiggle rod is for. 

Stock charcoal grate from a Large Big Green Egg like Eger has.

As the coals burn down, usually about 6 to 8 hours into a low temp cook, smaller coals and rocks may fall into the holes as shown above (I set these for demonstration).  Ash then fills in around the debris and can block air flow.  When enough of the holes get clogged, you will start to see your cooking temps fall because the fire is no longer getting the amount of airflow that it needs to burn.  The fire is being partially smothered from below.  This is where the wiggle rod can help, it's an instant fix for clogged charcoal grates.

Would you mind elaborating more on the wiggle rob please? Did you make it yourself? are you accessing the egg from the bottom vent? or top? taking the grid off etc?

To make a wiggle rod, I just take an 18-inch long metal bbq skewer and bend the tip up as shown.  You can also use a coat hanger if the wire is stiff enough.  

Wiggle rod
You don't have to take anything out of the kamado.  To use the wiggle rod, I access the cooking chamber by going through the bottom vent and then the vent hole of the fire box.  

This can be pretty hot so wear appropriate protective equipment when doing this on a live fire.

You can't really see, so you are going by feel.  Have the tip angled up towards the charcoal grate and drag it along the bottom of the grate to find the holes.  When you find one, poke the tip up and wiggle it to dislodge the coal, debris, and/or ash like this. 


(NOTE:  This is looking down at the charcoal grate in an empty kamado with the wiggle rod coming up from below.  Normally this would be covered with coals and wood, but I wanted to show what's happening when you use a wiggle rod.)

When done, re-position your vents they way that you originally had them and you should see the cooking temps start to rise back up.

Prevention of Air Flow Problems

The best way to minimize chances of these problems is to clean out your kamado grill before setting up for a long cook.  I also try to put larger pieces of coal on the bottom and smaller on top, but not to the extent that I'm sorting coal.  I'll just grab a few of the larger pieces out of the bag and then add the rest.  Even doing this, you can still occasionally run into problems with the hole style charcoal grates.

Some third party solutions also help avoid this.  High airflow grates like Fishbones by Innovations by Chance and High-Que use durable bar style grates that are almost impossible to clog.  I've used this one for over a year and I'm very happy with the results.

Fishbones grate lets plenty of air through and doesn't have holes to clog in the first place.

Grill Dome makes a high air flow grate for their awesome line of kamados and includes a ceramic disk to go on the base of the kamado as an additional heat shield from the higher temps.  My BBQ teammate has suggested that ceramic plate would be a good idea for any other brand of high air flow grates.

Picture from Grill Dome website

The Kick Ash basket is also eliminates this problem by eliminating the holes.  We use 4 of these at BBQ competitions and at home.  They also help us in getting the kamados cooled quickly after a contest or onsite event by getting the hot coals out and letting the ceramics start to cool immediately.


tl;dr
So to deal with those pesky temperature drops in long, overnight cooks:
  1. Set up the cook with a clean firebox and neatly stacked fuel,
  2. Consider a high air flow charcoal grate, and
  3. Use a wiggle rod at the first sign of trouble.  
 Thanks for the question, Eger! 
[Standard FTC Disclaimer]  Grill Dome, Innovations by Chance, and Kick Ash Basket are product sponsors of Nibble Me This. 

Monday, May 25, 2015

Thai Sticky Wings

This is a recipe from my book, The Kamado Smoker and Grill Cookbook.  It's one that I like to use for the "anything but" category of KCBS BBQ competitions and it got us our first award last year. 

wings kamado grill, Asian wings, grilled Asian wings
Our NMT Thai Sweet and Spicy BBQ Sauce gives these wings a ton of flavor.

I also used it this weekend when our team did a grilling demonstration at The Great Backyard Place here in Knoxville.  We met some great folks there, passed out lots of samples, and helped sell a good number of Grill Dome kamado grills and Saber gas grills.
 
Why yes, that is a Tennessee orange Grill Dome in the center.  You can get Grill Dome's in custom colors and this is one that the dealer has.
The book calls for cooking these wings indirect using the 30-20-10 method because it is real easy to burn the sugars.  Yesterday I tried cooking them direct on a raised cooking grid and just saucing them as the wings came off piping hot.  It worked just as well, if not better.   Tip:  I like to do the sauce, rub and trimming the night before so I can come home on a weeknight and just throw the wings on the grill for a quick bite.

Thai Sticky Wings

Ingredients
  • 4 pounds chicken wings
  • 1 tablespoon kosher salt
  • 1 teaspoon corn starch
  • 3/4 teaspoon ground black pepper
  • 3/4 teaspoon granulated garlic
  • 1/2 teaspoon ground ginger
For the sauce
  • 1/2 cup red pepper jelly
  • 1/4 cup Mr. Yoshida's Original Gourmet Sauce
  • 2 tablespoons cashew butter
  • 2 tablespoons sriracha sauce
  • 1/2 tablespoon finely chopped cilantro (optional)
 For garnish
  • wide Chinese crispy noodles
  • chopped fresh cilantro
  • finely chopped cashews
 Instructions
  1. Trim your wings into drummettes and wingettes, discarding or saving the wing tips for stock.
  2. Air dry the wings by placing them on a raised rack in the refrigerator for one hour.  This step is optional but gives you crispy wings.
  3. Preheat your grill to 400°F and set up with a raised rack like the Grill Extender or a homemade raised grid.  
  4. Mix together the salt, starch, pepper, garlic, and ginger and season the wings on all sides, turning to coat.
  5. In a small sauce pan over medium heat, stir together the sauce ingredients until combined, about 5 minutes.  Make sure the cashew or peanut butter is thoroughly dissolved.
  6. Place on the grill, close the lid and grill for 15 minutes.  Flip, close the lid, and grill until crispy and an internal temperature of 180°F, about 10 minutes.
  7. Remove the wings to a large bowl, top with about 3/4ths of the sauce and toss to coat.
  8. Spread about 2 cups of the crispy noodles on a platter, top with the wings, and drizzle the remaining sauce.  Top with cashews and cilantro and serve.


We get our Yoshida's at Sam's but I've seen smaller sizes in grocery stores.  If you can't find it, use a quality terriyaki sauce instead.  Our local Food City carries cashew butter.  If you can't find it at your store, you can substitute peanut butter or even make your own using a food processor and grinding up cashews.


This is the rack set up that I use in the refrigerator.  This is a half batch of the recipe shown.

grill wings kamado direct, Grill Dome grill extender
If you don't have a raised grid you can lower the temperature to 350°F and turn the wings every 5-8 minutes until done.

Grill Dome wings,
The raised rack just makes it a little easier to avoid burning your wings by lifting them up from the direct heat and closer to the heat reflecting off of the dome for even cooking.
 
Make sure that you toss them in the sauce as soon as the wings come off the grill so that the heat will set the sauce onto the wings.

Shot from the grill demo, there we passed samples out in small paper boats like this, which would also be great for one handed tailgating.  Excuse the mobile phone picture quality.

Grilled wings, gameday food, tailgating, how to grill wings
Make sure to have napkins or towelettes because these things are sticky, it's not just a cute title.

Kamado Karrier
Several folks at events have asked about how we transport our ceramic kamado grills to demos and competitions.  John and I spent a Saturday building 4 boxes like this.  When we arrive, we flip that base, add a paver, and it becomes our stand.

how to transport big green egg, how to move Grill Dome

In transport, the "kamado karrier" sits on a 3/4" rubber mat.  The kamado itself sits on a piece of double thick cardboard and a rubber mat.  The ceramic firebowl inside of the kamado also sits on a piece of cardboard and rubber.  

Oh yeah, forgot to mention our trailer floor is rubberized, so that is 3 layers of shock absorption under the kamado.


Finally the rest of the internal ceramic pieces are braced and cushioned with pieces of cardboard.  I'd guess that 99.5% of kamado grill owners will never have to transport your grills like we do, but there ya go.

Monday, May 19, 2014

How To Grill Raised Direct Using A Craycort Grate On A Kamado Ceramic Grill

I received a grate question from Brian S. this week:

I am new to the BGE and I found your blog, and I have to say I have tried a bunch of recipes off of it and have enjoyed them all especially the Asian wings.  I bought a cast iron grate from Craycort I was just wondering how you do a direct raised cook with it?  Any info would be great. 
Kamado grill (Big Green Egg, Kamado Joe, Vision, etc) users often use a technique called "raised direct". Moving the food up from the direct heat of the fiery coals and closer to the reflective heat from the dome balances out heat and minimizes the need for frequent flipping.  With a spatchcocked chicken done with the raised direct method at 350-375°F for an hour, you don't even have to flip the bird at all.  

This is one of the 50+ tips, tricks, and techniques from my book, The Kamado Smoker and Grill Cookbook, which comes out this August.  Each technique is paired with an original recipe for you to practice on your kamado grill. 

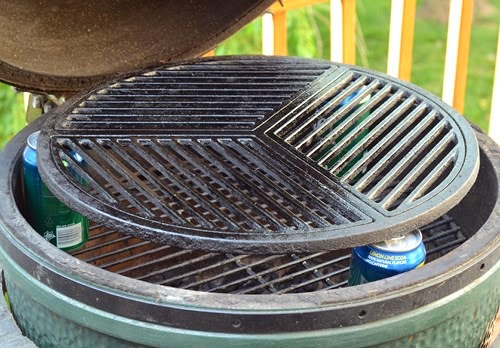
There are several ways to do this while using my favorite cooking surface, the Craycort cast iron grate.  You can use the same techniques as a regular grill grate but because the Craycort has removable inserts (so you can use accessory inserts or add fuel/wood), you just have to make sure to position it carefully on a few of these methods.

Raised Direct Using A BGE Grid Extender
The Grid Extender is a piece of equipment sold by Big Green Egg to provide an elevated cooking surface and/or add capacity to a kamado cooker.  I put the Grid Extender on a regular cooking grate and then just lay the Craycort on top of the Grid Extender as shown.  You have to position it so the three spindles or "arms" of the Craycort aren't tilting on the metal loops of the extender legs.
 
how to raised grid big green egg, raised direct BGE, kamado grill technique, grill dome technique
Grid Extender shown on a regular grate.  Yes, my extender has seen some years of use.

how to raised grid big green egg, raised direct BGE, kamado grill technique, grill dome technique
Craycort cast iron grate placed on top of a grid extender.

how to raised grid big green egg, raised direct BGE, kamado grill technique, grill dome technique, Craycort cast iron grate
Top view.

Raised Direct Using A Homemade Grid Raiser
Doug H. does a fantastic job running The Naked Whiz, a superb website resource about kamado ceramic grills.  He gives step by step directions for easily and cheaply building your own raised cooking grate.  I use a homemade rig the majority of the time.  Just put it on a standard grate and then put the Craycort on top of that.
how to raised grid big green egg, raised direct BGE, kamado grill technique, grill dome technique
Homemade grid raiser in place.

how to raised grid big green egg, raised direct BGE, kamado grill technique, grill dome technique
Craycort on top of a homemade grid raiser.
Raised Direct Using Three Cans
I have seen many people suggest using 3 empty cans on top of another cooking grate to support a raised grate as shown.  I haven't used this method because I haven't had too, but it seems like it would work in a pinch.  I would be careful about how much weight you load on top of them.  Also, I would not use this often or for long, just because I'm not sure what fumes might gas off from the paint/metal on the cans at higher temps.  You can also do the same thing using fire bricks instead of the cans, which is more stable.
how to raised grid big green egg, raised direct BGE, kamado grill technique, grill dome technique
This method raises the cooking grate significantly higher than the other methods but it depends on your cans.

how to raised grid big green egg, raised direct BGE, kamado grill technique, grill dome technique

Raised Direct Using A Double Fire Ring
If you are lucky enough to have two kamado grills, you can steal the fire ring from one and double it up on the other.   The advantage to this method is that it still lets you use all of the Craycort inserts, like a veggie wok, griddle, or chicken throne.  This is also the most stable method.

how to raised grid big green egg, raised direct BGE, kamado grill technique, grill dome technique
Double fire ring in place.

how to raised grid big green egg, raised direct BGE, kamado grill technique, grill dome technique
Craycort on double fire ring.
Raised Direct Using A Spider Rig
A spider rig is a useful wire bracket sold by the Ceramic Grill Store.  You can use it for a wok stand or for lowering a 13" grate just above coals for high power searing.  If you invert it on a regular cooking grate, you can also use it for a raised direct cook that isn't as tall as the other methods.

how to raised grid big green egg, raised direct BGE, kamado grill technique, grill dome technique
Spider Rig inverted to use as a grid raiser.

how to raised grid big green egg, raised direct BGE, kamado grill technique, grill dome technique
Notice the Craycort is lower than the top of the base here, compared to the other methods.

how to raised grid big green egg, raised direct BGE, kamado grill technique, grill dome technique

Thanks for the question, Brian! 

Wednesday, November 13, 2013

Green Chile Rubbed Tri-Tip (Raised Direct Method)

I have been into beef tri-tips the past few months.   It is a tender and beefy cut that, to me, is every bit as good as a roast tenderloin.  In fact, I might like it better.

Last week I reverse seared a tri-tip, which is a technique of slow roasting to the done point and then finishing with a quick red hot sear.  This week I am using a technique called "raised direct" which is when you grill over hot coals but with distance between the food and heat.   

Green chile rubbed tri-tip, BGE tri-tip recipe, Grill Dome tri-tip recipe, raised direct kamado technique
Served with salsa and charro beans.
The recipe for the charro beans comes from Steven Raichlen's BBQ USA.  We made it pretty much as written and these will definitely be joining our table anytime we make TexMex meals from now on.

Tuesday, July 9, 2013

How To Make Beer Braised Corn on The Grill and an Easy Tex Mex Corn Salsa

Salsas tend to brighten up during the summer with vivid colors and fresh flavors.  Plain ole "stick a corn nacho chip in me" tomato salsa takes a back seat to seasonal fruit and vegetable salsas.   A colorful bounty like this salsa I made not only tastes good, it's good for you.

Stoneware by Stony Claystation, Lenior City, TN. 

In general, eating a brightly colored diet is more healthy for you, as noted in the article Color Me Healthy - Eating For A Rainbow of Benefits in Today's Dietitian.  Of course, it is relative because eating a pound of Skittles doesn't count, I don't care how colorful they are.  

I used the beer braising method for the corn part of this salsa.

Monday, April 1, 2013

Blackened Chicken Sandwich with Cajun Slaw

We were in Perdido Key, FL last week for a combination work trip/spring break vacation.  This week I plan to do three recipes inspired by our visit there.

The first is inspired by the Sunset Grille.
Sunset Grilled Perdido Key

Sunset Grille is on the water at Florida's western state line.  They are located at the marina from where we used to leave for fishing trips.  When the boat got back to Holiday Harbor, we'd always get lunch at Sunset Grille.  The food is typical grill fare with some seafood items thrown in.  Its name comes from the spectacular view that it gets at sunset.

Sunset Grilled Perdido Key

Trevor always gets the 1/2 lb Sunset burger and one of my favorites is their blackened chicken sandwich with slaw.

Sunset Grilled Perdido Key

My version of their blackened chicken sandwich is done on the grill and I made a Cajun style slaw.  I threw in a side of sweet potato fries and a cilantro lime mayo. 

blackend chicken sandwich with cajun slaw, big green egg chicken recipe, grill dome chicken recipe, kamado chicken recipe

Blackened Chicken Sandwich with Cajun Slaw

by www.nibblemethis.com

Ingredients (4 sandwiches)
    You'll need
    • 4 chicken cutlets
    • 4 kaiser rolls
    • 1/4 cup butter, melted
    For the blackening rub
    • 1/2 Tbsp paprika
    • 1 1/4 tsp kosher
    • 1/2 tsp onion powder
    • 1/2 tsp garlic powder
    • 1/2 tsp black pepper
    • 1/2 tsp white pepper
    • 1/2 tsp red pepper
    • 1/4 tsp dried oregano
    • 1/4 tsp dried thyme
    • 1/4 tsp celery seed
    For the slaw
    • 1/4 head green cabbage, thinly sliced
    • 1/4 green or red bell pepper, thin julienne sliced
    • 1/4 sweet onion, thin julienne sliced
    • 1/4 c mayonnaise
    • 1 T cider vinegar
    • 1 tsp blackening seasoning
    • 1 tsp salt
    • 1 tsp sugar
    • 1 tsp pepper
    • 1 tsp hot sauce
    • 1/4 tsp celery seed
    Instructions
    1. Mix the dry rub ingredients together.
    2. Make the slaw. Put the cabbage, bell pepper, and onion in a bowl. Whisk the remaining ingredients together, pour over the veggies and toss to coat. I like to add a little of the dressing at a time until I get the consistency that I want.  This works best if you can make ahead and refrigerate it for 2-3 hours before eating.
    3. Preheat a charcoal grill with a cast iron skillet or griddle plate to 450f.
    4. Brush buns lightly with butter and toast until browned, about 15-30 seconds. Set aside.
    5. Drizzle just enough of the melted butter (about 1 Tbsp) over the chicken breasts to lightly coat. Season with 1/2 of the dry rub.
    6. Ladle a few tablespoons of the butter onto the hot griddle and place the cutlets onto the griddle seasoned side down. (Note: The butter may smoke a LOT. Don't worry, that's why we do it outside, just don't spill butter on the flames or it will flame up.) Cook until the edges of the cutlets start to turn white, about 3-5 minutes.
    7. Ladle the remaining butter over the chicken and season with the remaining dry rub. Flip and cook until the chicken reaches an internal temperature of 155-160f, about 3-5 minutes.
    8. Remove and serve on toasted buns with the slaw.
    Powered by Recipage

     You have options on the chicken.  You can buy split boneless, skinless breasts, cut them in half lengthwise and pound them with a mallet.

    blackend chicken sandwich with cajun slaw, big green egg chicken recipe, grill dome chicken recipe, kamado chicken recipe


    Or for just $.50 more a pound, you can just buy chicken cutlets.  For me it just depends if I am feeling lazy or not.


    Stupid Bun Tricks
    When I'm using a chimney starter to fire up Kingsford briquets for my Smoke Hollow grill, after the smoke is cleared, I'll put a GrillGrate over the chimney and "power toast" my buns, just 10 seconds or so each.  


    Another thing I like to do sometimes is mince cilantro and red pepper and add it to olive oil for brushing the buns.  It gives a pop of color and adds flavor.


    Season heavily, the seasoning, butter, and hot cast iron will form a "crust" that is the blackening.

    blackend chicken sandwich with cajun slaw, big green egg chicken recipe, grill dome chicken recipe, kamado chicken recipe
    Set up for a standard grill - cast iron griddle or skillet will work.

    On my Big Green Egg, I used the griddle insert for my Craycort grate system.

    Visual cues - I know it's time to flip when I can see "white" creeping up the sides of the sizzling breasts.

    blackend chicken sandwich with cajun slaw, big green egg chicken recipe, grill dome chicken recipe, kamado chicken recipe
    This cook can be smoky and messy.  That's why we do it on the grill instead of in the kitchen.


    blackend chicken sandwich with cajun slaw, big green egg chicken recipe, grill dome chicken recipe, kamado chicken recipe
    It may be a "side dish" but for me, slaw is more of a condiment.

    blackend chicken sandwich with cajun slaw, big green egg chicken recipe, grill dome chicken recipe, kamado chicken recipe
    My blackened chicken is better than theirs...but I can't beat their view!

    Do you have a favorite "vacation restaurant" and if so, what is it?  

    Monday, March 18, 2013

    How I Cook Ham on the Grill

    "...then hang them in the house and neither bats nor worms will touch them."

    I was going to be all "Hey guys, Easter is just around the corner, time to break out the ham recipes" and stuff but I found that opening quote much more shocking.  

    That quote is from Marcus Porcius Cato in 50 BC writing about how the Romans cured hams in his treatises on Roman farm management.  From the old days until relatively recently, hams were made basically the same way.  They were cured in huge clay jars or containers for days and weeks, then smoked and aged.  Now most are injected with a witch's brew of nitrites and tumbled to expedite the process to just a few hours.

    I did a test run on a ham this weekend and thought I would write up how I prepare hams on the grill.


    Preparing the Grill (I use a Big Green Egg)
    • As with any cook longer than an hour, I make sure to clean out the grill, removing ashes and unused coal.  I make sure that the vent intakes are all clear.
    • For a ceramic grill, I load it with coal and 5 or 6 chunks of wood or 2 cups of wood chips (I don't soak either).   I prefer straight hickory for hams.  Why do I like a blend of hickory and fruit woods for ribs and shoulder but not ham?  I dunno.  I just do. 
    • Once my fire approaches 200f, I slowly start closing the vents and try to let the temp coast up to 250f.  Then I put the plate setter in, legs up, with a drip pan on it and the grill grate*** on top of that.  
    • For a kettle grill or offset smoker (Brinkmann, Charbroil, etc), I'd set it up indirect for a "fuse style" burn (aka Minion method).   See this link at Grilling.com for how to do indirect set ups. 

    I do a layer of coal, a layer of wood chips and repeat several times until the grill is full.


    Meat Prep
    • Selection - There are a ton of hams out there.  
      • Fresh - this is just the upper part of the back leg of a pig, no curing, smoking or aging.  
      • City hams - most popular style in American, cured and boiled or smoked, partially or fully cooked
      • Country hams - Cured, smoked and aged, required to be cooked before eating.  
      • Picnic ham - from the front leg (picnic) instead of the back, it is less tender and has more fat
      • Boneless hams - Some are deboned pieces of ham, they are okay.  But most are chunks of ham formed together, I consider them the McRib of hams and try to avoid them.  
      • Specialty hams - Black forest ham, prosciutto, tasso, various European hams
    • I like to get a semi-boneless, fully cooked half ham about 7-8 pounds.  I prefer the butt half instead of the shank half because it is meatier and gives nice big contiguous slices of ham.   I avoid spiral sliced hams, only because I like the control of slicing them myself.  
    • Brine - None.  They have already been cured/brined by the supplier.
    • Injection - Can NOT do this this a spiral sliced ham.  I took Chris Lilly's pork shoulder injection and modified it for ham as follows:  3/4 c water, 1/2 c pineapple juice, 1/2 cup brown sugar, 2 Tbsp low sodium soy sauce.   I place the ham cut side down and inject all over the ham every 2 inches or so.  I do this an hour before it goes on the smoker/grill.
    • Rub - I take a basic BBQ rub that is high in sugar and low in salt (I modified Melissa Cookston's Quick and Easy rub) and then add a pinch or two of ground allspice and cloves.  It takes 3 - 4 Tbsp. I don't use a binder, I just slather any of the leaked injection around the ham before rubbing it.
    Notice the plastic still on ham.  It helps minimize wayward squirts.

    Season heavily on all sides except the cut end.


    Smoking
    • Once the smoker/grill is stable at 250f, I put the ham, cut side down, on the grill cooking grate (on the side without coals if you are using a kettle style grill) and cook with the lid closed.
    • I monitor the internal temperature of the ham using a remote probe thermometer.  
    • Glaze - Once the ham reaches an internal temp of 135f (about 3 1/2 hours), I place it in a stoneware pie pan (just to keep my grill clean) and glaze the ham with a cola glaze (4:3 ratio of brown sugar to cola) and continue cooking until the ham reaches an internal temp of 145f.  
    Sure, you could just cook it in the oven but double smoked is the way to go in my opinion. 

    The pie pan is just to keep the grill from being a mess with the cola glaze.


    Finishing
    • Not a lot is needed here.  Just slice and serve.
    • My favorite sides for ham are a genre that I call "church social".  Casseroles, macaroni salads, and rolls.  
    Almost too pretty to slice.  Almost.

    This isn't even 1/2 of the ham.


    Storing/Reheating
    • Ham might be the best food for re-working leftovers.
      • First, you can eat it cold, straight out the fridge.  Late at night.  In the dark.  Wearing only boxer shorts.  Don't judge me.
      • Thy Daily Bread.  Thinly sliced, it works in sandwiches from basic ham and cheese to fancy classics like Croque Madam and Monte Cristos.  
      • Green Eggs and Ham.  You don't have to eat it on a boat with a goat, but ham and eggs have tons of possibilities like omelets, breakfast burritos, or egg scrambles.  
      • Casserole Central.  There are more ham casserole recipes out there than stars in the sky.  As Carl Sagan would say, "Billions and billions..."  and most of them are great comfort food (maybe not great for you).
    • I made a cheesy ham pot pie with some leftovers that I will be posting later this week.

    So what are your favorite ham tips or ham recipes?  

    ***Grill grate vs cooking grid - Yes I know that Big Green Egg refers to the grill cooking grate as "a cooking grid".  I saw someone on the forum mock someone for calling it a grill grate.  Everyone else calls it a grill grate. If a car manufacture decided to call the steering wheel for their cars a "navigation disc", I'm still calling it a steering wheel.